Sunday, September 25, 2011

Let's talk zipper flies. . .in pictures!

Zipper flies are scary, right?  Well, not so much if you ignore the instructions that come with most patterns and use Sandra Betzina's method.   You can watch a video here and another one slightly modified to include the fly shield there.  In all of my googling though, I have yet to find a good still picture tutorial showing how to do this method.  My method is a combination of the two, and I took pictures as I went, so I could share with you.

Here we go.  You have your leg inseams sewn and top-stitched on both legs, and your crotch seam allowances finished (serged or zig-zagged).  Sew the crotch seam from back to front with a normal stitch length, stopping at the bottom of the fly panel (where the bottom of the zipper goes).  Backstitch there.  Lengthen your stitch length to a basting stitch and finish sewing along the lines marked on the pattern to the waist edge.  Like so.  If you can't see it, the red pin marks where I lengthened my stitch. 


Now, press open along the stitching line.  (I've said it before, and I'll say it again. . .it is impossible to press too often, so when in doubt, press!)


Then, attach your zipper to your prepared fly shield with a row of stitches.  The stitching line doesn't need to be close to the zipper teeth.  (On a side note, I suggest you always use a zipper longer than what you need.)


Next, place the zipper (with fly shield attached) face down on your pants front with the edge of zipper tape lined up along the basted seam line.  Pin it in place, pinning only through the fly shield and not through the front of the pants.


Flip the front of the pants out of the way and stitch it in place, stitching closer to the zipper teeth this time.

It will look like this. 

Now to attach the other side of the zipper tape to the other fly extension.  Flip your zipper, fly shield and fly extension combo to the other side, letting it fall where it wants to.  Pin the other side of your zipper tape only to the fly extension.  Your zipper will be face up. 

Stitch it in place close to the zipper teeth.

Now, you are basically done!  Flip everything where it is supposed to be. . .it will be obvious. . .and top-stitch.  You may want to do bar tacks as well.

Using your seam ripper, remove the basting stitches that hold the fly shut.


You're done!  But this part is key.  When you sew your waistband on, make sure your zipper is down, and only after sewing the waistband on, cut off the top tails of your zipper. 

Voila!

Saturday, September 24, 2011

Honest-to-Goodness Pants. . .Part 1

My favorite part of pants making, other than the ta-da moment when you finish and get to be so proud of yourself, is the details.  On jeans, one of those details is the back pocket design. 

Recently, someone approached me with a brilliant idea that was quite the eye-opener for me!  Bobolots, her sewingmama user name, wanted someone to digitize a pocket design for her, and since I want practice digitizing, I volunteered to try it out for her.  Her idea was AMAZING!

As it turns out, she had drawn a pocket design, including cutting and seam allowance lines.  I decided to steal her idea for Allie's pants pockets.  Perfect pockets!


Last night I browsed online and found a back pocket design that I thought would be perfect for Allie.  So, I copied it.  (Are you sensing a theme here? . . .LOL!)  You may recognize it.


See the light blue lines?  The outer line is the cutting line, and the inner line is the fold line.  After folding and pressing the seam allowances to the back, this is what the pocket will look like.  Love it!

Sunday, September 18, 2011

The Honest-to-Goodness, Yes You have to do a Real Fly, Pants Sewing Challenge!

Do you always do elastic waists, but your kids are getting too old for that look?  Have you resorted to a flat-front, faux-fly so you don't have to do a real one?  Are you worried that your zipper fly won't come out right or that your top-stitching skills aren't up to the challenge of real pants or jeans?  Do you avoid them just because you prefer a quick and easy project?

Yes?  Well, I have a challenge for you!  We will call it the "Honest-to-Goodness, Yes You have to do a Real Fly, Pants Sewing Challenge" and it is just in time for cooler weather.  Will you join me?


I have two different washes of denim and this year's favorite Otto 1/09 pants pattern sitting on the cutting table just waiting to turn into beautiful blue jeans for Allie.  I bought two colors of thread for top-stitching and a couple of real metal jeans zippers, which I've never used.  I may even try some of the distressing techniques that I never got to when I made Allie's jean skirt. 

If you don't want to do jeans, any bottom-weight will work, including navy or khaki twill if your kiddos have to wear uniforms to school ;).  Get yourself a good pattern.  Kwik Sew is great for their instructions, and we all know I love Ottobre.  Get your pattern traced and dive right in!

I'll post some pointers as I make mine, but don't feel like you have to wait on me.  When you are done, show them off. . .post your picture in the Flickr group I'll create one day this week and post a link to.  At the end of October, I'll draw a random winner from all of the pictures posted in the picture pool, and yes, there will be a prize!

Friday, September 16, 2011

San Francisco

I spent most of the week in San Francisco at a conference.  The days were full, but we (my coworkers and I) did get to see a few of the iconic landmarks.

Ghirardelli Square, which by the way smells heavenly!


Unfortunately, was too full from dinner in Chinatown to sample any of the chocolate, but dinner was absolutely delicious!

We went to see the Golden Gate Bridge, but the fog was too thick to really see too much of it, but we did ride the cable car back to the hotel.

Up and down the hills!


We stayed in a hotel in/near Union Square, which a quick search told me was the location of Britex fabrics, so on Wednesday after the conference ended, I decided to walk over for some fabric shopping.  On the way, I saw this window display. . .cool, huh?!

And, there it was.

I spent a couple of hours just looking around.  It was so much fun!  I ended up buying only a few things.  A Burda Plus magazine; some green striped fabric, which will be part of Jenna's Halloween costume; some brown webbing and belt buckles for the girls; and 2 super-cute bird zipper pulls, which I simply couldn't resist!

I had a great time, but I was glad to be home! 

Friday, September 9, 2011

Olives or Tomatoes. . .maybe?

I found this really pretty jersey at Hancock's (I think) in the clearance section, and I really liked it, but I'm not sure what the gray and pink circles are supposed to be.  It is also a bit of an odd combination with the gray on the brown background, but I still like it. 


Allie picked it out for a shirt, so I made her yet another Otto "Dots T-shirt." 


For Jenna, I made the Ottobre teapot tunic.  I really like this pattern for little girls.  The pattern calls for a bound hem, but I did a regular hem on this one.  (The hem isn't wonky. . .it is just laying funny.)


Monday, September 5, 2011

Faux Wrap Top

After the Sarita Jeans, I needed a project that would be fast and easy, so I cut out a few long-sleeve t-shirts this afternoon.  Allie has a RTW t-shirt that has the cross-front that she really likes, and I had only a little bit of this Yoshi rib knit left, so I thought this might be the perfect project for that.  I had the red and pink interlock and the brown ribbing in my stash.


I used the same long sleeve t-shirt pattern that I used here and here.  I traced two fronts and drew a curved line from 2 inches from the top of the side seam blending in with the natural shoulder seam on the other side (going the opposite way on the other front).  

Instead of binding the neckline, I did the ribbing the same way it is done on a traditional t-shirt neckline.  I  even tried something new, using the chain stitch on my coverstitch machine  to stitch down the seam allowances where I applied the binding.  I like it and will definitely use it again!


Back to work tomorrow!

Sarita Jeans

These are from Ottobre 1/09, the Sarita Jean.  They are a slim fit pant, and since Allie is just barely in a 128, I thought they might be just right for her.  I chose a brown bottom weight from Joann's, which in hindsight, gives them a slightly UPS uniform or 70's bell bottom feel, but I like them anyway! 


The fit on her is almost perfect.  They are still slightly big in the waist, but I think a belt will remedy that.  And, my long-legged girl could also use just a little bit of extra length to give her some room to grow.

I did all the top-stitching on these with two strands of regular thread rather than top-stitching thread.

I embroidered the back pockets with a free embroidery from the Janome website.

I will definitely be making these again. . .after I take a break to sew something uncomplicated!  I think I'll try to alter the line of the legs to make them straight-legged and skinny as well.

Saturday, September 3, 2011

Dortje for Jenna


I don't usually do much embellishment on clothing, but Farbenmix Dortje trousers beg for it, so I decided to try my hand at it for Jenna.  I did the 3-part pieced legs on these and inserted rick-rack into the seams between the knee panels and the pant tops and bottoms.    Here is the front:

And the back shows my other embellishment!

I made a 5/6, which is still a little bit too big for her, but maybe they will fit a little better by the time it cools off here.  The embroidery on the pockets is a free design from Lynnie Pinnie.


The pocket facing gives her a little surprise, and since I forgot to add a hem allowance when I was cutting the fabric, I ended up doing a hem facing with the same fabric.


Next up, pants for Allie. . .without the fun embellishment :)

Friday, September 2, 2011

I need one of these in my size!

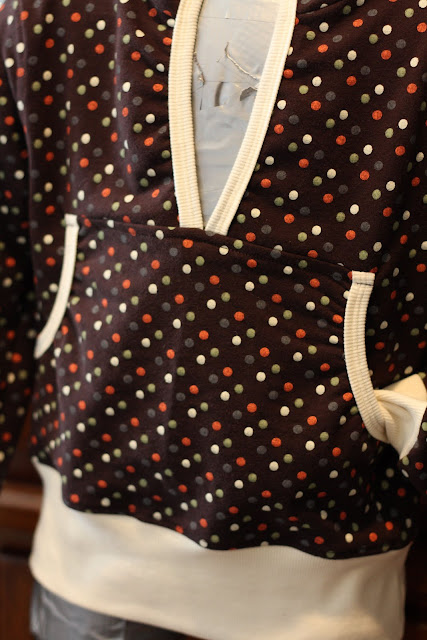
Ottobre Autumn 2007 issue was one of the first ones I bought, back when Allie was 3 and Jenna was just a baby.  I was immediately drawn to design #24, the "Hooded Sweater," but it starts at a size 128, which seemed like it would take FOREVER for one of the girls to fit.

Finally, Allie can wear a 128, so I knew this would be part of my fall/winter sewing for her, and I LOVE it just as much as I knew I would

I did lengthen the pattern by a couple of inches, but I wanted the extra-long cuffs and band. . . I think it is part of the charm of this pattern.


The brown polka dotted fabric is some yummy french terry that has a good amount of stretch.  I lined the hood with some cream interlock that I had in my stash.  The cuffs and band, and binding are all cream ribbing.  (I really wanted green ribbing, but Joann's didn't have it this time.)


Maybe I will make a light green t-shirt to go under it. . .Love it!

Thursday, September 1, 2011

National Sewing Month!

September is National Sewing Month. Isn't it great that there is a whole month dedicated to sewing?!


Be sure to visit the National Sewing Month website.


Sewing is making a comeback for a lot of reasons, I think, but I would love to know why you sew.   If you wonder why I sew, you can read about it here.