Where were we? Let's see, we've attached our frill and button bands to the fronts of our shirt/dress. Tonight, let's tackle the sleeves. First, we will sew a row (or two or three) of gathering stitches between the markings on both sleeve caps. (sorry for the poor sideways picture!)
Gather your sleeve caps until the sleeves fit into the armholes of your shirt. Pin and sew them in place. (Finish your seams with a serger or zig-zag stitch on your sewing machine.) Press the the seam allowances toward the body of the shirt. I suggest using a pressing ham to help you shape this part of your shirt.
Topstitch close to your seamline, but only on the yoke. (It took me a second to catch this part of Otto's directions although rereading them now, they seem perfectly clear.) Like this:
Okay, get ready--your shirt or dress is about to really start looking like a shirt or dress with this next step. Sew up your side seams and under-arm seams (and finish the seam allowances). Take a second here to make sure you line up the front and back under-arm seams. Press. (I don't know if I've said this with almost every step, but if I haven't, add it in your head!)
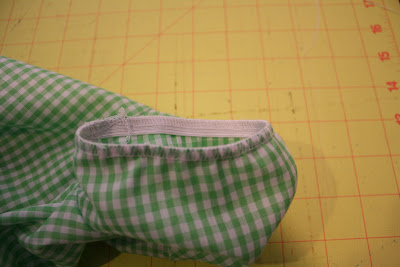
Now, let's apply our elastic to our sleeve hems. Take the length of elastic specified by the pattern and cut it in half. Sew each piece, so it forms a circle.
Now, the Ottobre instructions tell you to finish the edges of your sleeves with your preferred method (zig-zag, serge, etc.) and then baste the elastic into the openings, stretching as you baste. Then, they say to fold the elastic to the inside with the hems forming a casing and stitch close to the inside edge of the elastic, stretching as you sew. You can, of course, do it that way. I chose to serge the elastic to the sleeve openings, stretching as I serged and then flip it to the inside and sew--it just saves a step or two.
Now, press your sleeves again and give the elastic a good steam to help it bounce back into shape after all that stretching. The result: super-cute puffed sleeves!
Tomorrow, we'll put on our collar. . . don't worry, it isn't hard.
In the meantime, check out Stacy's finished dress! She made a few modifications, and it turned out so adorable that I may have to make yet another of these dresses for summer. http://thelandofka.com/?p=6959


I've got both shirts cut out and the yokes & backs stitched. Today is my catch up day with several hours of uninterrupted sewing time, so I'm hoping to have the shirts mostly finished by the end of the day!
ReplyDeletebtw, I'm lining the yokes like Stacy did with her dress.
Thanks Sandra! I am working on another one now...this time for Easter. It is going much faster now that I know what I am doing LOL!
ReplyDeleteI need to get a pressing ham, too. That is one thing I really miss when I am doing things like this.
I'm still planning to sew this, my Ottobre still hasn't arrived so I will be WAY behind.
ReplyDeleteThanks for sharing Stacy's dress, it was so cute.
I'm slowly but surely working on my two. I'm just about finished with the steps in this post--just the elastics in the sleeves left. Sure wish my serger was working!
ReplyDeleteI like the idea of lining the yoke! I will have to remember that for next time!
I have a pressing ham and a sleeve ham my mom gave me. They're great!!
It sounds like you are all doing great! This is so much fun, yes?!
ReplyDelete